Everything you need to know about hiking Las Torres a Chileno Trail to the Torres del Paine viewpoint – one of the most iconic hiking trails in Patagonia, if not the world.
The spectacular landscape of Torres del Paine National Park in Chile is featured in countless photos and paintings as a symbol of rugged, natural beauty, sparking wanderlust in travelers from all over the world. As a result, hiking to the awe-inspiring Mirador Base las Torres overlook via the Las Torres a Chileno Trail is high on the bucket list for many travelers and hikers. My brother and I happen to be two of those people, and we finally had a chance to give it a try last month (March 2024). Even if you have no idea what I’m talking about, you may recognize the place.


Today’s post will tell you everything you need to know about the world-renowned hike that I’ve seen listed as “Mirador Las Torres”, “Base de las Torres”,”Base of the Towers”, or “Torres del Paine Viewpoint via Las Torres a Chileno Trail” (if you use AllTrails). It’s the most popular hike in the most famous National Park in Chile.
Pro Tip: If you want to track your progress and avoid taking a wrong turn, download a trail map in advance. Cell service in Torres del Paine is spotty at best. I use AllTrails+ to download maps and access them offline—it’s been a game-changer for staying on track in remote spots.
Note that there are two other famous multi-day hikes known as the O circuit / O trek (~80 miles in 8-10 days) and the W circuit / W trek (46 miles in 4-5 days), but they obviously require a much bigger time commitment. The day hike to the Torres del Paine Viewpoint is a total distance of 12.5 – 13.5 miles, depending on where you are dropped off or parked. If you’re short on time, the day hike is clearly the best option.
Table of Contents
Heads up: Some of the links in this post are affiliate links. If you buy something through them, it helps support this site—at no extra cost to you. I only recommend stuff I genuinely use and trust.
A Brief History of Torres del Paine
One of the first description of Torres del Paine was in 1880 from Scottish writer, Lady Florence Dixie. She called the three towers “Cleopatra’s Needles”. In subsequent decades, many scientists and explorers visited the area. Finally, in 1959, the area was established as a National Park under the name Parque Nacional de Turismo Grey (Grey Lake National Tourism Park).
The name of the park was changed in 1970 to Parque Nacional Torres del Paine (Torres del Paine National Park), in reference to the three prominent towers that extend as high as 8,200 ft above sea level. The three towers are known as Torre d’Agostini, Torre Central and Torre Monzino. Torres means “towers” and Paine means “blue” in a native language called Tehuelche that was used by nomadic hunters in the area. Torres del Paine National Park has been designated as a UNESCO World Biosphere Reserve since 1978.
Today, Torres del Paine spans 700 square miles and has over 250,000 visitors a year, with over half of those tourists visiting from abroad.
Best time to visit Torres del Paine
If you’re looking to hike, then the best time to visit Torres del Paine is between December – February. Unfortunately, you won’t be the only one with that idea. This is considered to be peak season (summer months) in Patagonia. My brother and I decided to push it a bit and visit in March. We were lucky that we didn’t experience any bad weather during our entire trip. While there are certainly lots of tourists, it didn’t feel overwhelming.
Finding the Trailhead
One of the first challenges people face in hiking in Torres del Paine National Park is figuring out how to get there from an airport in Chile or Argentina, such as Puerto Natales and Punta Arenas in Chile, or El Calafate in Argentina. This is particularly true if you plan to rent a car to explore both Argentina and Chile. If you’re looking for information on how to drive there with a rental car from El Calafate, Argentina, then you’ll want to check out my previous post that provides travel tips for driving overland to Torres del Paine, Chile from El Calafate, Argentina. Many people choose to take a bus or private van from Punta Arenas and/or Puerto Natales in Chile.
My previous post also provides information about the where to find gas near Torres del Paine National Park. As my last post points out, Puerto Natalas has the closest gas station but, depending on where you’re staying, there might be closer, less formal options that involve a funnel and 5 gallon containers.
If you aren’t staying in the National Park, then you’ll likely have an early morning wakeup, followed by 60 – 90 minutes of driving, much of it on dirt roads, to get to the trailhead. Waze and Google Maps both seemed to work, but phone reception is spotty, so you’ll want to download the route in advance. If your app or map has difficulty finding the “Torres del Paine trailhead”, you can enter “Hotel Las Torres”, which is located right next to the trail.
Entrance Fee to Torres del Paine National Park
While there’s no fee to hike “Mirador Las Torres” / Torres del Paine Viewpoint via Las Torres a Chileno Trail, you’ll need to pay a park entrance fee to get into the National Park. Here’s a link to a page that shows the entry fees. You can book a reservation for your park visit in advance, and I recommend you do so, as it’s a very popular National Park. As a foreigner, I paid about $31 for a pass. The entry fee is valid for 3 consecutive days.
Cutoff Times for the Hike
Believe it or not, there are cutoff times that you must meet in order to continue your hike. Hikers that haven’t reached a certain point of the trail by the cutoff time will be turned back by park rangers. Here’s a link to a Torres del Paine National Park document that includes a list of cutoff times for the various trails and also you’ll find the times listed below.

The moral of the story is, start your hike early! You’ll want to give yourself enough time to enjoy the hike without stressing about cutoff times. It’s a long, strenuous hike that can take many hours to complete. Conservative guidance suggests you should plan on taking 10-hours from start to finish for this 12.5-mile out-and-back trail. If you park at the main lot by the visitor center (where most people park), it’s closer to 13.5 miles round trip. It can make for a long day, particularly if you have a lot of driving to do before or after the hike.
My brother and I parked at the main parking lot by the visitor center (the 13.5 mile option) and it took us about 3 hours to get to the summit, 30 minutes to relax and eat a snack while enjoying views at the overlook, and then about 2 hours and 20 minutes to get back down. So, about 6 hours in total. While we aren’t speed demons, we were hiking significantly faster than most of the people we saw on the trail. We were also hiking light with a small day pack.
In other words, if you’re a fast hiker, then 5 – 7 hours sounds about right. If you’re going at an average clip, then 8 – 10 hours is a good estimate for the entire trip. If you’re an accomplished trail runner and plan to run the trail, then you could probably knock it out in 2 – 3 hours. Hopefully that gives you a sense of how long it might take for you. Regardless, you’ll want to be in pretty good shape before tackling this hike.


Hiking the Trail
So what’s it like to hike the Las Torres a Chileno Trail to the Mirador Base las Torres overlook? Here’s an idea of what to expect.
Starting the hike
Unless you’re staying at the Las Torres Hotel or getting dropped off by a bus or van, your starting point will likely be the visitor center parking lot. And you won’t be alone. It’s crowded since everybody wants to get on the trail early to avoid missing the cutoff times. Plus, many people are dropped off by buses or vans around the same time. You’ll find restrooms, snacks, and souvenirs available at the visitor center.


The first part of the hike is an easy gradual downhill. Of course, you’ll pay for that early descending slope later in the hike. But hey, live in the moment, and enjoy it!
Hotel Las Torres
Less than a mile down the trail, you’ll come across Hotel Las Torres. As you approach Hotel Las Torres and its primo location at the trailhead, you’ll be thinking, “wow, I should’ve stayed here!” But, after looking at the prices for a room at Hotel Las Torres, you might be thinking, “then again, maybe not.” Prices for a basic room start around $600 per night and go up from there. Still, it would’ve been pretty amazing to walk out of my room and start the hike, so I certainly wouldn’t rule out splurging for a room there.


The Climbing Begins
Once you pass Hotel Las Torres, you’ll soon cross a footbridge over the river (after about 1.3 miles), and then the fun begins. You’ll be climbing about 1,200 feet in elevation over the next 2 miles, so that should get your heart pumping. We found the trail to be crowded during the steep parts, with many people stopping to catch their breath. Fortunately, the trail is wide enough to make it easy to pass people.


After climbing uphill for bit, you’ll get your first view of “Windy Pass” (pictured below). While you should plan on encountering strong winds, we lucked out and there were no high winds during our hike. There wasn’t much wind at all during our entire hike. You’ll want to check the weather forecast and plan accordingly.

As you hike through Ascencio valley, you’ll have a beautiful view of the Ascencio river that flows through Windy Pass.

Refugio Chileno
As you hike through the valley, you’ll continue to gradually gain elevation until, after about 3 miles, you’ll arrive at “Refugio Chileno”, a camping area with a basic restaurant. Refugio Chileno offers simple “simple premium camping”, which consists of 2-person tents that are raised ~5-feet (1.6m) off the ground. Only 1-2 people are allowed to stay in a simple premium camping tent. Renting a tent also gives you access to shared bathrooms and hot showers. You’re not allowed to use camping stoves. If you aren’t staying at Refugio Chileno, you can use their bathroom for a small fee.


The cost to rent a tent and high-density foam mat varies, depending on the time of year (high season vs. low season), but roughly varies from $55 – 65 per person. If you want to have a tent by yourself, then it costs an extra ~$30. If you also want to rent a sleeping bag and pillow, then add another $15 per person per night. Here’s a link to the most recent prices. You can also purchase food packages (half board or full board) or individual meals. Prices are roughly $15 for breakfast, $17 for a packed lunch, $28 for regular lunch, and $28 for dinner during the time of our visit. We didn’t eat there, so I can’t comment on the food.
Moving on from Refugio Chileno, we encounter some California Dreamin’
After you pass Refugio Chileno, the trail continues along the river for a while before you cross over to the other side via another bridge.


Once you cross the river, the trail starts to gradually climb as it weaves through the forest. We also passed a “Welcome to Torres del Paine National Park” sign, even though I thought we were in the Park all along.

Shortly beyond the sign, we came across a trail crew who were busy doing some trail maintenance. As we started to approach them, one of the workers started singing the opening verse to a 1965 song by The Mamas & the Papas, called “California Dreamin'”. It didn’t take long for the rest of the trail crew to join him. As a result, we had the enjoyable experience of walking through the trail crew while being serenaded on all sides of us by the singing trail crew. It was fun to see and hear.


Steep climb to the overlook
Soon after the serenade, the character of the trail changed quite a bit. Think steep and rocky. One thing that we noticed right away was the amazingly high percentage of people using trekking poles. Perhaps they are people who are doing to O and W treks. I’d say well over half the people we saw were using trekking poles at this point. Perhaps we were just jealous.


After a good stretch climbing the steep trail, we exited the trees, but not the rocks. From this point on, there would be no trees. Just lots of rocks, as the trail weaves up towards the overlook.


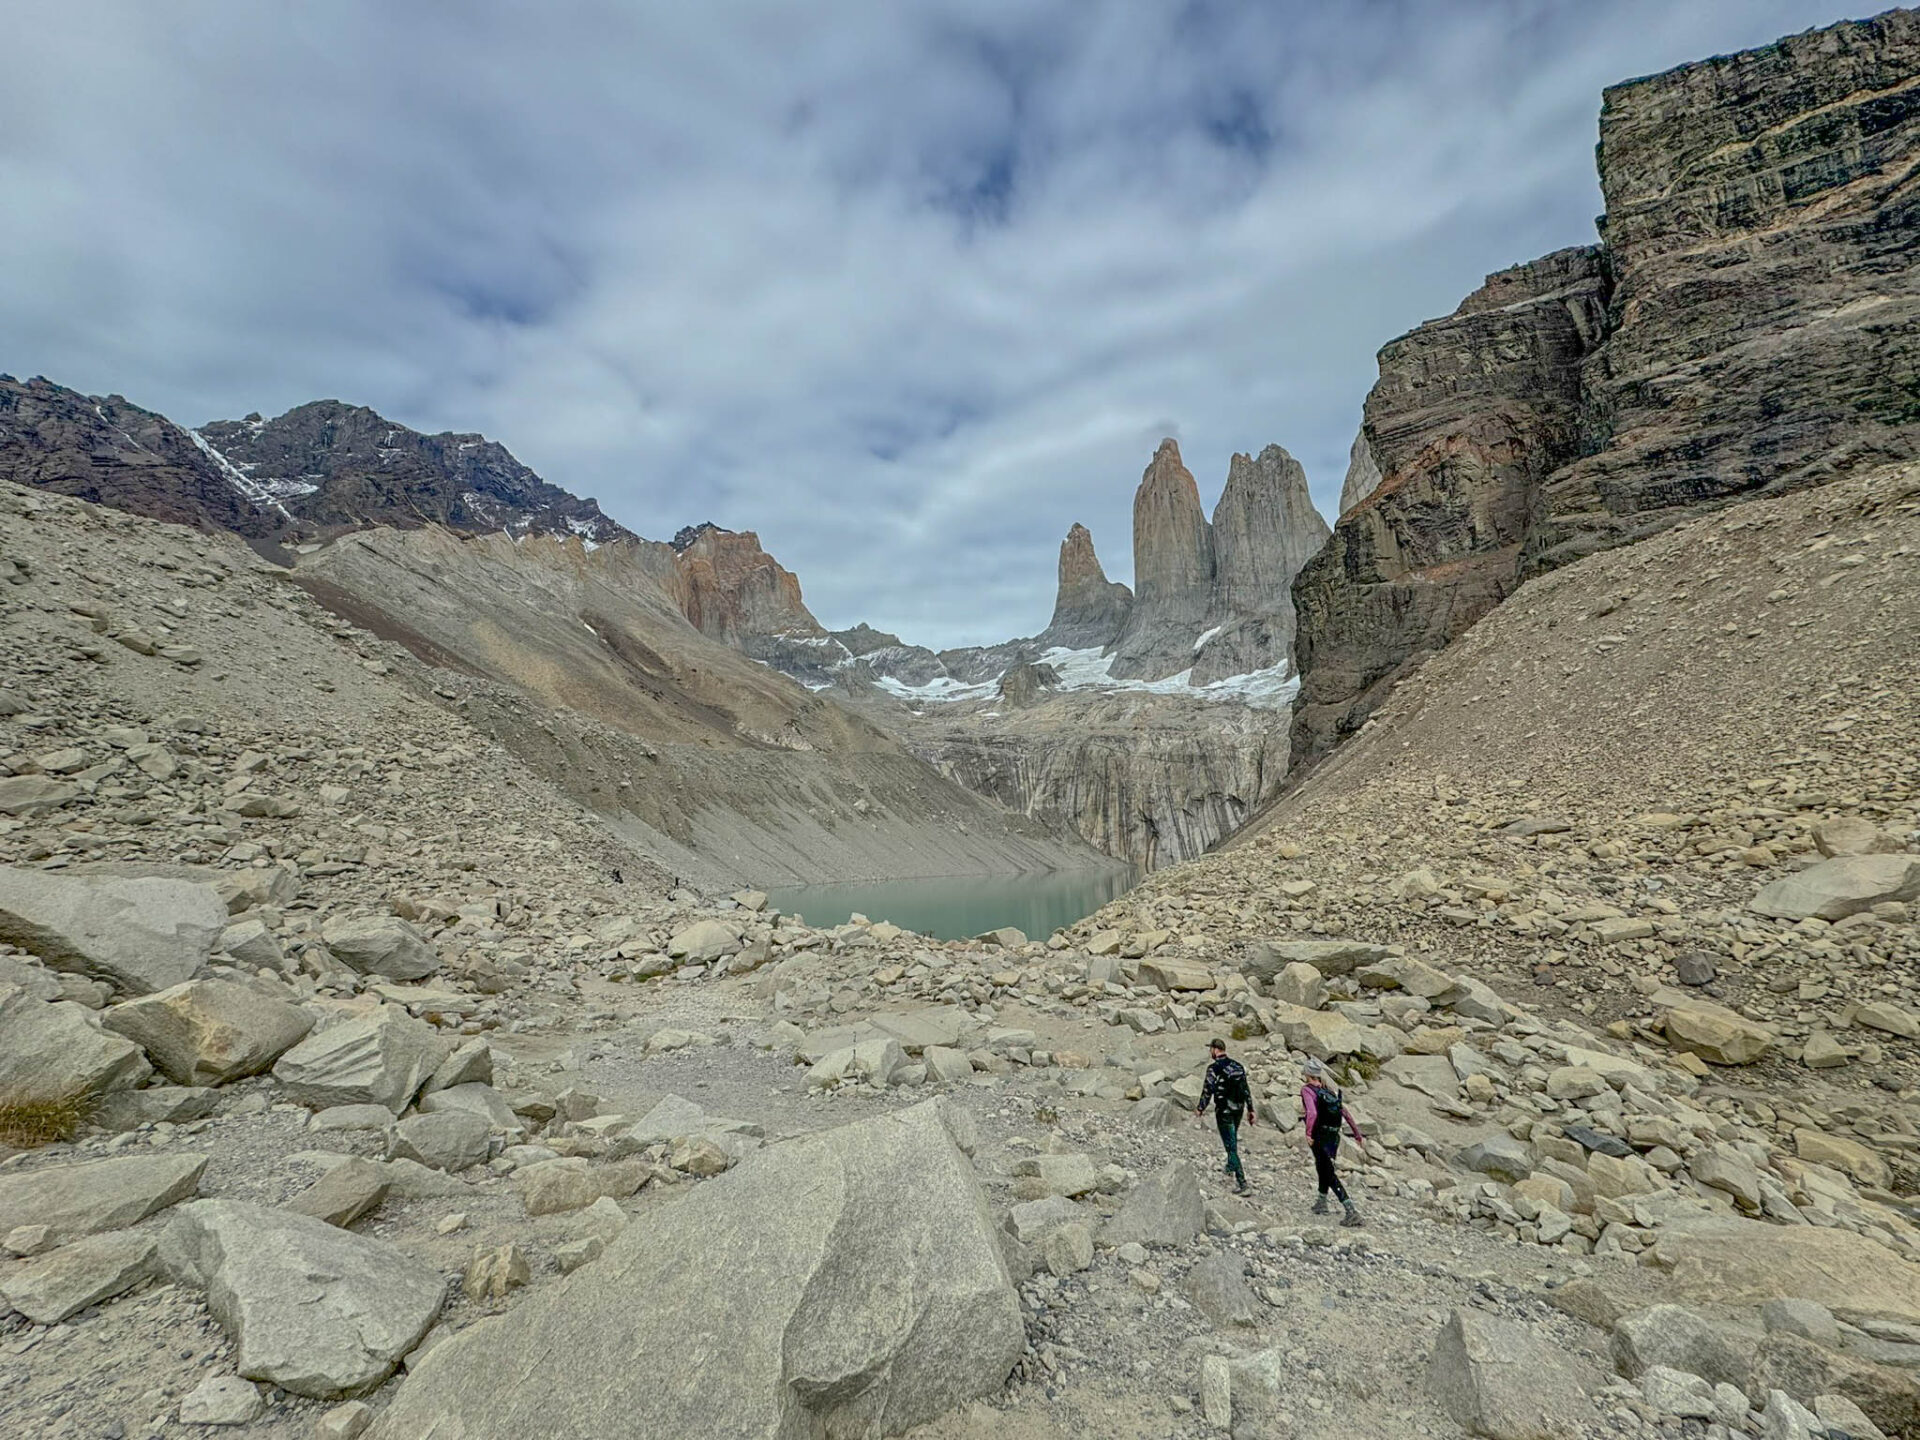
The reward at the summit
After an elevation gain of 3,326 feet in over 6 miles, you’ll finally be rewarded with the beautiful view of the the Torres del Paine Overlook. There wasn’t any wind on the day we visited, and the water was perfectly still, creating a nice reflection of the towers in the water. Even though there were about 20 – 30 other people at the overlook, there was plenty of space to enjoy the moment. People were taking turns exchanging cameras for photos and posing at the water’s edge. One guy was doing a challenging yoga pose (Twisted One-Legged Arm Balance Pose I – Eka Pada Koundinyasana I) on a rock in the water as his friends snapped photos. Everyone seemed very happy to be there.
After taking lots of photos, we found a nice rock to sit down on and take in the views while eating a snack, which for me consisted of crackers, salami, and chocolate. Not exactly a gourmet lunch, but it tasted great after the effort to get there.


After spending about 20 – 30 minutes enjoying our lunch in such an amazing spot, it was time for the long slog back to our car.


And that’s it!
It was definitely a strenuous hike for us, but we had a great day for it. After stocking up on some drinks, treats, and souvenirs in the visitor center, we were back in the car. We had a 5 hour drive ahead of us but, given the state of our thrashed legs, we didn’t mind sitting down for a while. Needless to say, our legs were very sore the next day.
If you ever get the chance, I highly recommend the hike to “Mirador Las Torres”, “Base de las Torres”, “Torres del Paine Viewpoint via Las Torres a Chileno Trail“, or whatever you want to call it. It’s certainly one of the best day hikes that I’ve ever done and I can see why it’s considered to be one of the most famous hikes in the world. It’s an experience you won’t forget.
Thought for the Week
It was harder than I thought to find relevant quotes with a Chilean or Patagonian bent. But here’s what I came up with. This week’s thought for the week comes from Yvon Chouinard, an American rock climber and founder of the company known as Patagonia. It’s a stretch, I know, but I’ll go with it.
“At Patagonia, making a profit is not the goal because the Zen master would say profits happen ‘when you do everything else right'”.
— Yvon Chouinard
Thanks for reading and happy travels!
Mark (The New Mexico Travel Guy)

Mark Aspelin, The New Mexico Travel Guy (www.newmexicotravelguy.com), is a travel writer, conservation biologist, project manager, and author of two books. He’s visited over 100 countries and all 50 U.S. states—just enough to land in the Travelers’ Century Club and make choosing a favorite place nearly impossible. He’s currently on a questionable mission to visit every town in New Mexico (there are over 500) and write a story about each one, with plans to wrap it up sometime before his early to mid 100s. Mark balances his writing with conservation and project work from his home base in the East Mountains near Albuquerque, New Mexico.


We are planning to hike the W and your overview of the hike the base Torres, reassured us and we are excited to hike! Great pics of the views and hike, giving us a good picture of what it is like to hike there. Description and estimation of the miles helped tremendously! Thank you!
Thanks so much, Brinda! I’m really glad the article helped with your planning. The W Trek is an incredible experience, and the hike to Mirador Base Torres is definitely one of the highlights. Wishing you a fantastic hike and a wonderful trip to Patagonia!